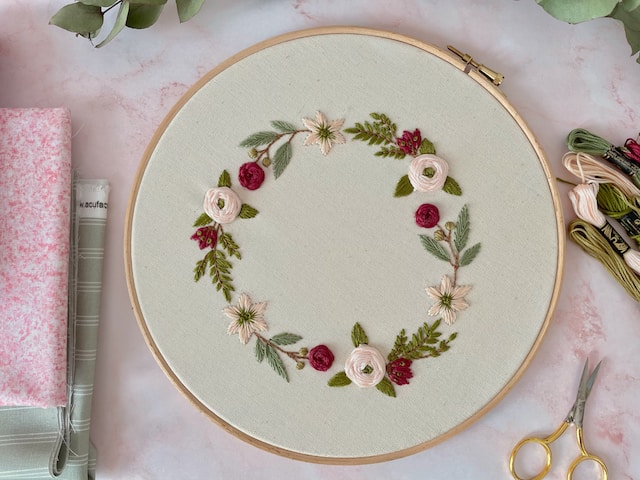
Have you ever wondered — can Cricut embroider? Although many are aware that Cricut is primarily used for cutting vinyl and crafting paper, it is also an excellent tool for producing embroidery patterns.
In this post, we’ll dive into all the ways you can use your Cricut machine for embroidery. From different techniques to tips for creating stunning designs, I’ll show you just how versatile this machine can be. So, let’s get started!
Can Cricut embroider?
No, Cricut is not an embroidery machine.
It’s not designed for embroidery functions such as stitching.
However, you can use it to draw embroidery patterns on fabric and cut textile patches and appliques for embroidery.
Cricut vs embroidery machines
While both Cricut and embroidery machines can be used for creating designs on fabric, they have different functions and capabilities.
Embroidery machines are made for embroidering with computerized technology.
They use a needle and thread to stitch a design, but they can’t cut materials or draw embroidery patterns.
These machines have a hoop or frame that holds the fabric taut while a needle moves up and down, stitching a precise and intricate design on textiles.
You can import a digital design or create custom art on a computer, and then transfer it to the machine for stitching.
The Cricut, on the other hand, is a cutting and drawing machine.
It doesn’t use needles or thread, and can’t embroider by stitching.
But it can cut complex and detailed designs on a wide variety of materials, including paper, vinyl, card stock, and fabric.
With the use of Cricut pens, it can also draw art, text, and patterns on various materials, including fabric too.
You can import or create line types for it using Cricut Design Space software.
So Cricut and embroidery machines have different functions and strengths.
If you’re into crafting, you’re going to love this combo.
They work wonders together!
You can cut complicated and detailed fabric art, letters, and shapes with Cricut.
While your embroidery machine will add texture and detail to make your projects pop.
Or use Cricut’s drawing capability to create patterns for hand stitching.
How can you use Cricut for embroidery?
Here’s how you can use Cricut to help you embroider in more detail:
1. Draw precise and intricate patterns for embroidery on fabric
Cricut is compatible with special pens and markers.
So you can use the machine’s drawing function to create detailed embroidery patterns on fabric that will be difficult to draw by hand.
One type of Cricut pens contains water-soluble washable ink.
It’s perfect for drawing designs and patterns onto fabric.
And after you embroider your piece, you can wash the pattern off.
This will let you create unique custom projects.
2. Cut fabric appliques with precision
The Cricut can also cut fabric with precision.
This makes it easy to create appliques and patches for your embroidery projects.
Whether you are using the Cricut Explore in combination with bonded fabric or the Cricut Maker with any type of fabric, creating appliques and patches to embroider highly detailed designs has never been easier.
Tools and supplies you’ll need to use Cricut to help you embroider
1. Cricut machine
The first and most obvious tool you will need is a Cricut machine.
The Cricut Explore or Cricut Maker are both excellent options for drawing and cutting embroidery patterns and appliques on fabric.
You can also use Cricut Joy for smaller projects.
2. Cricut pens
To draw your embroidery patterns, you’ll need a Cricut pen.
The Cricut brand has a range of pens that are compatible with their machines.
For drawing on fabric, you’ll need to use the special water-soluble washable fabric pen.
3. Bonded Fabric Blade or Rotary Blade
If you’re using a Cricut Explore or Cricut Maker to cut bonded fabric appliques, it’s super important to know which blades will work best.
For the Cricut Explore, you’ll need to get the Bonded Fabric blade.
It’s the perfect tool for achieving clean cuts without any fraying or tearing.
On the other hand, if you have the Cricut Maker, you have more options!
The Rotary blade is also compatible and can cut a ton of different fabrics without the need to bond them first.
Just keep in mind that the Explore machine can’t use the Rotary blade, so make sure you choose the right one for your Cricut unit.
4. FabricGrip mat
You will need the pink Cricut FabicGrip mat for holding the fabric in place while the machine is drawing your embroidery pattern or cutting your appliqué.
This mat is available in several sizes for all Cricut machines.
Its adhesive surface is ideal for fabric projects.
5. Fabric
Of course, you will also need a piece of fabric to cut your appliqué from or draw your embroidery pattern on.
Choose a type that is suitable for your embroidery project and that will work well with the Cricut pen or blade.
If you’re using a Cricut Explore machine to cut and draw on textile material, using bonded fabric is the way to go.
This type of fabric has a heat-activated adhesive on the back that helps to keep it in place while the machine is cutting it.
Which makes it easier to cut and prevents fraying. Bondef felt, for example, is ideal for appliqués.
And if you have a Cricut Maker, you get many more options to choose from.
The Maker can handle a long list of different fabrics without needing them to be bonded.
All thanks to its amazing rotary blade.
That means you can use even the most delicate fabrics without worrying about them getting ruined.
6. Cricut Design Space app
The Cricut Design Space is the software that you’ll need to use for creating designs for Cricut machines.
Make your art from scratch or import the drawing lines for the Cricut pen or blade to follow.
7. Brayer
If you want your Cricut to give you clean and precise cuts,
make sure to smooth your fabric on the mat with a brayer.
It’s a roller tool that you can use to remove wrinkles or bubbles on the fabric piece before cutting.
A brayer is especially handy when working with delicate or stretchy materials that might shift during the cutting process.
8. Lint roller
It’s important to make sure the fabric is nice and clean before you start.
This helps the cutting blade or the drawing pen move smoothly without skipping or tearing the material.
An easy way to get rid of any lint or debris on the fabric is to use a lint roller.
It’s gentle on the fabric but super effective at picking up any loose fibers or particles.
Once you have all these tools and supplies, you are ready to draw your embroidery pattern on fabric with a Cricut.
How to draw embroidery designs on fabric with Cricut
Step 1: Prepare Your Design
Choose a design you want to embroider and import it into the Cricut Design Space.
You can also create a new design in this app from scratch, using shapes and lines to build your desired pattern.
Step 2: Load the Fabric and Pen
Insert the water-soluble washable fabric pen into your Cricut machine’s clamp A.
Then place the fabric with the colorful side facing up onto the pink FabricGrip mat.
Align it with the top left corner and the grid lines of the mat.
Smooth it out with a brayer to get rid of any wrinkles or creases in the material to ensure accurate drawing.
Load the mat into the machine and press the “Load” button.
Step 3: Select the Material and Adjust Settings
First, open up Design Space and choose the design you want.
Make sure to adjust the size so that it fits perfectly on your piece of fabric.
Then, select the Linetype option and choose “Draw”.
Select the fabric material that you are using and adjust the settings in Design Space accordingly.
Step 4: Draw the Design
Press the “Go” button on the Cricut machine to begin drawing the embroidery pattern onto the fabric.
Watch the machine as it draws to make sure that the pen is moving accurately and that the material is not shifting during the process.
Step 5: Remove the Fabric
Once the drawing is complete, unload the mat from the machine.
After that, remove the fabric from the mat.
Step 6: Embroider the Cricut Design
Use the drawn lines as a guide for stitching the embroidery design onto the fabric.
How to cut appliques for embroidery with Cricut
Step 1: Prepare Your Fabric
Wash and dry your fabric to remove any markings or dirt if needed.
Iron the fabric to get rid of wrinkles.
If you are using bonded fabric, there’s no need to wash or iron it.
Just go over it with a lint roller to pick up any debris.
Step 2: Create Your Design
Using the Cricut Design Space software, create or import your design.
Adjust the size of the design to fit your fabric piece.
Step 3: Load the Mat and Fabric
Place the fabric on the FabricGrip cutting mat, making sure it is smooth and wrinkle-free.
In case of using bonded fabric, you’ll need to place it on the mat with the colorful side facing up.
Load the mat into the Cricut machine.
Step 4: Adjust Settings
Select the fabric type and adjust the machine’s settings according to the type of fabric you are cutting.
For bonded fabric, select that option in the settings.
Step 5: Cut the Fabric
Press the “Go” button to start cutting the fabric.
Watch the machine as it cuts to make sure everything is going smoothly.
Once the cut is complete, remove the mat from the machine.
Step 6: Remove Fabric from Mat
Carefully remove your piece of fabric from the cutting mat.
Use tweezers to remove any unwanted bits of fabric.
Step 7: Apply and Enjoy Your Creation
Embroider your Cricut appliqué or patch to your final project and enjoy your new creation.
Use it for quilting, clothing decor, or any other project you have in mind.
Experiment with different fabrics and designs to create unique and personalized items.
Can I use a Cricut machine to cut intricate designs for appliques?
Yes, most Cricut machines are capable of cutting pretty intricate designs for appliques with great precision.
For a precise cut, it is important to use a sharp blade and ensure that the fabric is well secured to the cutting mat to avoid any shifting or tearing while the machine is cutting.
What software do I need to create embroidery designs with a Cricut machine?
The Cricut Design Space software can be used to create or import embroidery designs for use with a Cricut machine.
You can also use other design software, like, for example Adobe Illustrator, to create SVG files for importing into Design Space too.
Can I use any type of fabric with my Cricut machine for cutting appliques or patches?
For Cricut Explore, use the special Cricut bonded fabric and the Bonded Fabric blade.
You can’t cut other textiles with this machine.
However, you can cut just about any fabric with Cricut Maker and its special Rotary Blade.
And for appliques, it’s best to use cotton, cotton blends, felt, and other fabrics with a similar texture.
Avoid using fabrics that are too thin, stretchy, or prone to fraying.
Can I use my own embroidery designs to draw with my Cricut machine?
Yes, you can upload your own embroidery designs into Cricut Design Space and use them for drawing.
However, you need to make sure that your design is compatible with the file format supported by Cricut machines.
The SVG format works pretty well.
Do I need a special pen to draw embroidery patterns with my Cricut machine?
Yes, you’ll need to use a special water-soluble washable fabric pen that is designed for use with Cricut machines.
These pens can be easily inserted into the pen holder of your Cricut machine.
Use it to draw embroidery patterns on fabric with your Cricut machine.
This ink won’t bleed but can easily be removed after stitching.
What are some tips for using my Cricut machine to create embroidery projects?
Make sure to always test your design on a scrap piece of fabric before cutting or drawing on your actual project.
Use high-quality fabric and accessories to guarantee that your appliques and patches look neat and professional.
Don’t be afraid to experiment with different colors, textures, and designs to create unique and personalized embroidery projects.
To wrap up, if you’re wondering whether a Cricut machine can do embroidery on its own, the answer is no.
But don’t worry, it can still be super-helpful for making embroidery designs in a bunch of other ways!
You can use special pens to draw embroidery patterns or cut fabric for perfect appliques and patches.
This will save you time and help you get precise results.
With some creativity and the right tools, your Cricut machine can take your embroidery projects to the next level.
Go ahead and explore the possibilities and see what amazing designs you can create!